Blogger seems to be having some issues.
Sorry for the duplicate posts, I am sure the Blogger team is right on this problem.
:)
31 December 2013
22 December 2013
Dash tear down
I needed to strip it down, so I can sand blast and paint it.
First was to remove all the attached bits:

Securing the dashboard on something sturdy and non-damaging, I began with the removal of the vents. They mostly click in, so reaching in and pinching the tabs allows all 4 of them to slide right out. I then started on the face parts: the cigarette lighter, the radio, the heat controls and the A/C controls.
The cigarette lighter is tricky. The secret is to use a small flat screwdriver to pop off the light housing on the side of the lighter assembly. It does not slide off. It clicks straight off. Once that is off, you are left with a cylinder. Two tabs hold that into the dash; depress them simultaneously and you can slide out the lighter assembly.
Map light pops out easily.
The radio that was in this dash is a fully functional original VW Clarion tape deck head unit. Someone has already asked for it, so I needed to be careful. I happen to have my dashboard tool kit for the Mercedes dashboards, so I was counting on that to remove the head unit properly. I was right, it did.

The pronged pieces in the kit worked great, but in all honesty a properly shaped coat hanger (thicker metal, not the cheaply made dry cleaner ones) would work great for this application.
Next was the controls for heat. The 4 knobs of the selector levels pull off with a bit of persuasion. Then the knob of the fan rheostat slides off. The face plate is held on by two press retainers and a couple tabs. A screwdriver carefully placed beneath the plate will enable a careful dashboard tech to gently slide off the faceplate. The rheostat will pop off now with two tabs, and the control lever mechanism is held on with three Phillips head screws; two accessed from the front and one in rear.
The A/C controls will pop off in one assembly. There are 4 tabs that retain the assembly upon the dash face.

All that is left is the dash pad cover and the latch mechanism for the glove box.
The dash pad comes off with 7 Phillips head screws and 9 speed nuts.


Now the pad releases from the dash and the 30 year old collection of grime is plainly visible!
Only thing left is to consider what you will do with VIN placard. You either need to remove and replace with your own, or tape it up, or remove and reapply this one after prep and paint.
Update - 29 Dec 13
Made some alterations to the dash today for tweeters, one on each outer side of the center vents.


And there a couple extra holes for power ports


Now for a bit of sandblasting (edges and a spot on drivers corner under windshield) and off to paint.

Update - 30 Dec 13 All blasted and ready to go


29 November 2013
Tis the season
Got festive with the lighting in the Thingamajigger this year.
Started with a set of AA powered LED lights from Lowes. Then it went to a set for each window. Then I edited the two up front as it was so bright inside the van, I could not be safe.


At first, I used some black duct tape to hold them in place, but after seeing how ghetto it looked I moved on to these

Here are the 'removable' and safe hanging clips. And the style of lighting I used.
Merry Christmas!

06 October 2013
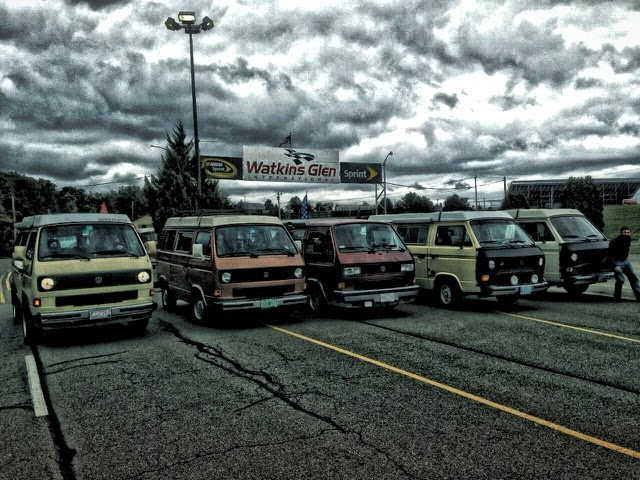
Westies at Watkins 2013
So I posted this a week ago, but for some reason Blogger wont let me post edits. Have to figure that out now. My igoogle homepage going away, blogger having issues, laptop keyboard went south, what next?
4 October 2013 - Update: was exactly how I thought - a good time.
On the way off the track, we stopped for this photo. Eric on right (in front of his 85), then Tom Buese second from right in his 84, Jim in his tintop, Art in the Assuan brown Westy and the Thingamajigger.
What I had not realized until I saw this photo, was how high the Thingamajigger rides in comparison to the other vans. The new zero-lift springs, and the 18 inch wheels really does make a bigger difference in ride height than I had thought.
There were somewhere north of 125 VW's registered at the event and despite the rain, we had a great time. Potluck was good - my 4 gallons of clam chowder went pretty quick in the cool rainy weather. And my son cleaned up in the raffle - won on 5 out of 6 tickets!
The Thingamajigger ran very well, except for the speedo. The cable kept popping out. So I ran home without it, and for my troubles received a speeding citation. Went something like this:
Trooper - good afternoon, do you know why I pulled you over?
Me - sorry officer, I have to assume its due to my place being obstructed by my cargo carrier?
Trooper - No, I observed you speeding. You were doing upwards of 80 plus in a 65.
Me - (feigned surprise) Really, that ironic because aside from my speedo being temporarily broken, so I have no way to dispute your claim, this 4500 pound van only has 82 HP so that has to be an error on the radar? Are you sure it wasn't picking up the speed of the vehicles behind me, that passed me as we passed by your radar position?
Trooper - license and registration sir.
Me - Sure Officer
Trooper - Where are you coming from?
Me- we camped in a State Park out here, and are now headed home.
Trooper - why isn't the little one buckled in?
Me - He was, but being 6 he got excited when I said there was a police officer pulling us over. He thinks its amusing and cannot wait to tell his uncles the police officers about it.
Trooper - get him buckled in
Me - Yes sir
Trooper walks back to the car and returns with a citation for 80 in a 65.
Me - cursing under my breath as another Westy from Massachusetts drives by and I tuck in behind to be able to monitor speed.
Lesson of the story - the nicer you make the van (ride characteristics), the more likely your speedo will break and you will have no idea you are going as fast as you actually are. I understand this happens in my SUV, but never thought I would have this problem in a T3!
Needless to say - I have been pissed off about it since. Have not ridden in the van since then as I have gotten really busy at work and with my sons Cub Scouts. Maybe today I go for a ride and let the old girl know I am not mad at her.
15 September 2013
The Big E
The northeast's version of the state fair, the Eastern States exposition was this weekends destination.


Camping out overnight is the way to see this event. We went Friday (opening night) in order to beat some crowds. It had rained earlier to day and was forecasted to be chilly out, so we figured we would stand a good chance to have minimal crowds.
We were right.
Arrived in lot by 5:30. Paid the $20 to camp, and looked for a spot away from the camp buses that would have generators humming all night (annoying - if you need that much crap to camp out - stay home) Found a spot next to a dirt hill that would ensure that no monster bus could tuck up next to me during the night, and gave my son a start point or some play time while I set up.
We had dinner, and then headed over to check out the fair. Opening night $10 admission for me, free for my son. Unlimited rides for $20 and no lines, he must have ridden 100 rides by the time we called it quits at 9:30.
Perfect nights sleep for both of us, chilly morning though. Fired up the little buddy heater to take edge off and made some miso soup.
Started morning with Beignets in the expo, saw competitions amongst the cow, sheep and horse folk. Watched some pig racing. Old restored tractors, activities for my kid and finished up with some rides on the ponies and a camel. Freak show starts arriving after noon, so we had a couple hours to wander as we felt necessary and saw everything we wanted to without issue.
Reminded me of the Geico commercial - What day is it? Huuuummmp Daaaaayyy!
Van drove well, no issues at all. Good times.
10 September 2013
Firsts
Was doing a bit of reflecting last night; on the summers activities in the Thingamajigger and realized that there were a lot of 'firsts' for my son this year and many of them happened during trips with the Thingamajigger. I am by no means accepting that this summer is over, but my wife's two degree temperature comfort window has closed - so it will be him and I for the rest of the year. Have three more trips planned, and potential for a couple others as the time approaches.
First rock climbing (NH), first 3rd story leap into a stunt pillow (NH), first day without training wheels on his bike (Maine).
First hike to top of mountain (Western Mass) and exposure to the breathtaking views. First alpine slide (NH). First water slides (NH). He has visited two artisan cheese makers, a smokehouse and countless farm stands / 'you pick farms'.
Lost first four teeth while camping - one in a grilled cheese and one in a strawberry while in Washington DC, then one in North Carolina and most recently in Maine while eating corn on the cob.
His first try at tubing down a lazy river (VT) his first go kart ride (NH) first mini golf (and a hole in one too). First Loggerhead turtle hatching (NC), and first climb up a lighthouse (NC).
His first time fishing in New York, Maine, New Hampshire, and Vermont.
Many of these things will be done by many children across the states this year, and probably not in a Vanagon. But I can't help but think I am creating some great memories for him with the assistance of this van, and hopefully he learns to not take it for granted.
Forgot
I forgot to wish my van a Happy Birthday.
In August the Thingamajigger turned 30 years old. She was manufactured in August 1983.
Happy Birthday Thingamajigger, you dont look a day over 20!
In August the Thingamajigger turned 30 years old. She was manufactured in August 1983.
Happy Birthday Thingamajigger, you dont look a day over 20!
08 September 2013
Buese shelf
So I had made his acquaintance once before, but at the Buses by the Bouy Tom Buese was camped right beside me in his spiffy Syncro Doka.


Gave me an opportunity to have a good look at his shelf setup. Tom is an architect by trade, but his salesmanship abilities are top notch. I bought one at his discounted 'on the spot' price and he installed it right away.
The basic construction is a piece of 3/4 inch plywood. It is roughly the same width as the inside distance between the upright supports short an inch or so for clearance, it uses a couple 'U' clamps to attach and can be outfitted with racks or hooks as one could desire.
The basic version that Tom sold me had a couple of Ikea rails for hanging towels, or mugs on the end. They are purposely set a perfect distance apart to hang wine glasses when drying.
Some use the top shelf for camp storage; pots and pans, kitchen items, or the like. I envision using it for placing my sons water, books or iPad to use in the AM while he waits for us to stir! Allows for a few more minutes of rest since my little energizer bunny of a son is WIDE awake at 6 regardless of bed time. Especially in the clean air of the woods.
The first photo is the shelf installed and in the stowed position when pop top is lowered. The cut out allows for the shelf to fit around the skylight.
With the top raised, but still in "stowed" position. It is essentially vertical.
Now with shelf lowered. Assuming a nice level placement of you van, the shelf too will be level.
Bumped my head last night, and then this morning. Will take some getting used to, but should not take long.
Tom can be contacted at: http://busware.biz/Other_Cool_Stuff.html
Buses by the Bouy 2013
Just got back from the BBTB 2013 event in Lebanon Maine.


 Tim and Kristen's Westy.
 Plenty of vans to meet new folks.


Really good time.
Little boys learn early - there is nothing like a well built and clean box to play with.
Lots of vans, I think about 75. Lots of laughs.
Doug, Bill and their families - of Freeport Maine.
Ian of Maine, and Eric of Vermont. My son fell in love with May, Eric's retired seeing eye dog.
The cargo carrier generated a lot of inquiries as did the use of 18x8 wheels.
A bit of a caravan out to a meeting spot. That many VWs generated some interest amongst the community.
Thanks to the organizers, it was a good time.
06 September 2013
Brown dashboards, black dashboards
My 1984 Westy came stock with a Brown dash. Not the covered version, but the metal rough surfaced version. It's in good condition, including the front end impact strip, but the plastic bits within the dash are not so great. The age of the plastic, and the oxidation is getting unsightly.


I am seriously considering swapping it out for a black dashboard, from a later Wolfsburg this winter.
What really pushed me over the edge was this photo, found on the Samba, that I REALLY like the looks of:
The added burled wood veneer brings the interior look closer to my Mercedes, and although I do not aspire to turn my beloved Thingamjigger into a Mercedes wanna be - it sure does look nice. Even considering the dark brown carpets I will have.
Have a good friend that parts out the Vanagon and he had a few Dash assemblies. I have some credit there as I have given him most of my takeoffs and promised him my parts van when I put the suspension back in it to move. What goes around, comes around?
I grabbed a mint condition black dash, with cluster cover, lower air vent, glove box, and all the pieces to make it complete. With the very dark brown checked seats and door panel inserts, I think I could get away with it without it looking too ghetto.
I suppose if I had to swap out the front seats for some Honda S2000 black ones, or recover some late model stock seats like the picture below in a faux leather product, I may not be so concerned. :)
UPDATE- 10 Sept - looking at the Sewfine catalog, it appears that a set of faux leather seat covers could be had for under $300 if I do the recovering myself. If I did that 'pleather' look, with a black tweed insert down the middle I would have a seat that would allow for a sweaty back to breathe. I don't have AC, so should I even be thinking about black?
But then what to do with the rear?
I need to finish packing for this weekends adventure.
Have a fun weekend everyone!
05 September 2013
One foil, two foil, bad foil, good foil
Oh, the dreaded blue foil. Yes, the delicate and no longer available blue foil.


Had to delve into this today. Little wisp of smoke yesterday tells me nothing good can happen by ignoring it.
Here is the major problem
My reaching into the dash caused this de lamination and the metal to cross over itself and arc.
So it was time to replace the foil. Luckily, I had another tach foil in the garage. So I started the surgery, being extremely cautious not to tweak the foil in any way that could harm it. I got them switched over and gave it a try. Still no gauges, or clock but the indicator lamps worked. It's a step in the right direction.
There is a small voltage regulator on the rear of the tach. Tiny little thing. Looks like this
It is known to create mischief. I tried three of them and best I could get is gas and temp gauges, but no clock. I will order a new one and see. When I tried the clocks directly connected to a battery, they worked. Once the screw is removed, the regulator can slide out easily.
While I had the tach out, and was disassembling the cluster anyway, I went ahead on modified the tach for the Bostig. I had an 85 tach in it which does not require modification, but the foil I just took out was a bit fused to the tach. So I swapped the while thing over for a tach and foil from an 87. So now I needed to modify the tach.
Bostig breaks it down pretty well, but here is a shot of the board in the tach.
The one over the whole towards the bottom center got changed. There is another on the right, just to the left of the light blue / brown striped one. That one gets removed entirely.
The other thing that needed to get completed while the cluster was out is the placement of the MIL light and the Low Oil light. After much consternation, deliberation and research of what others had done, I wanted a stock look.
Decided to use the unused lower location beneath the high beam for the MIL light, and after carving out the existing LED for oil, I placed the new oil light in its place.
That's right, I modified the blue foil! Well, I tried it on the old one first to make sure it could be done.
Carved off the port for the mid light, and the unattached lower port.
And then modified the front piece. Only required little changes, but a dab of black silicone to keep the new lights in place.
After it was assembled, it looks great. And nearly stock.
Still need to run the wires up front and connect for a full light test, but I am pleased with how it came out.
31 August 2013
Bigger brakes on their way.
Labor Day sale at Go Westy meant I bought the Bigger Brakes kit.

Supposed to rain again tomorrow, so I am thinking about digging back into the dash. Blue foil needs replacement, have a couple tweeters I have needed installed, controls on heater are tight, usual stuff.
UPDATE - received the kit. It was 73 pounds, plus the other box for the hubs.
.JPG) The hub kit seems to be a complete kit, with everything except thrust washers. Studs are pre-installed and I guess if you do not have spacers, they will be sufficient for most wheels.
The hub kit seems to be a complete kit, with everything except thrust washers. Studs are pre-installed and I guess if you do not have spacers, they will be sufficient for most wheels.

A bit tweaked over a $90 UPS ground shipping charge though. That box ought to be silver plated.
The late model spindles, rotors and calipers I received few weeks ago was $38 for UPS ground and also from California. I ship 250 pound ovens, valued at $7000-10,000 for $250 and that is with packing insurance and lift gate service!
Seems a big excessive.
Still patchy drizzle. So I broke out sandblaster, hung the sway bar beneath my ez up tent and sandblasted it. Cleaned it off with some enamel reducer, primed and painted with Imron. Moved it to my garage to dry (which will take a few days to properly cure).
At least I got something done on the van.
UPDATE - received the kit. It was 73 pounds, plus the other box for the hubs.
.JPG) The hub kit seems to be a complete kit, with everything except thrust washers. Studs are pre-installed and I guess if you do not have spacers, they will be sufficient for most wheels.
The hub kit seems to be a complete kit, with everything except thrust washers. Studs are pre-installed and I guess if you do not have spacers, they will be sufficient for most wheels.
The caliper assemblies are noticeably larger. The carrier is huge, as is the reservoir behind the piston. From a quick measurement, it looks as if the piston diameter is the same size as stock (2.25 inches) but the claim is that the larger mass of the rotor will increase the stopping power.

The outer diameter of the new rotor is roughly the same as the original '84 rotor. This is a hair larger than the later models diameter.
Here is to hoping the larger mass of the rotor and the addition of the BMW booster I have will dramatically add to the stopping ability of the Thingamajigger.
The expense is up there for a nominal change in stopping power, but what is my family's safety worth?
26 August 2013
Suspension . . . Next steps
Tomorrow I start the preparations for the front end changes. It will be down a week, but with an action packed September planned, I want it done. And considering the Labor Day weekend warriors, I will choose to stay local and continue camping when they are all done for the year.
First things first - need to install the replacement compressor. Then organize the garage to provide maximum working space on both sides. And hope for appropriate weather.
Will need the compressor to do some sandblasting- on the sway bar, and the undercarriage before pulling it in to the garage in order to minimize the mess inside. Hoping to have all blasting done in a couple days as I do need to work during the day. Need a few bags of blast media, as I won't be using the cabinet and some paint / under coating.
There is not much under there that I plan on reusing, so after I remove the wheels and the shocks I only need be concerned with the coating on the new springs.
The upper control arms, lower control arms, sway links, radius arms and spindles are all ready for install. Even bought some stainless cup washers and sleeves as a kit from T3 Technique this week as something I overlooked. Had the sleeves, just not the cup washers.
Looking for a Labor Day sale to order my bigger brakes. Had a near miss last trip that I want to avoid if it happens again: little 'back to college' airhead, with her brand new Honda Civic chose to stop for a yellow light within 10 feet of the intersection with a big Westy and a Suburban directly behind her. Her tires squealed, never mind ours. We veered away to each side and avoided a bad situation. If my Westy did not roll up over her car on its own, the Suburban behind me would have finished the job.
Update - Got my blast media, procured a few tyvek spray suits as the DuPont Corlar I will be applying underneath is nasty stuff when wet and extremely durable when dried. Ordered up the Corlar and will be picking that up today.
From the DuPont site:
DuPont™ Corlar® 934S™ 3.5 VOC Primer-Sealer
A two-component, 3.5 VOC, non-sanding epoxy primersealer that delivers excellent appearance (very smooth, very little texture) and excellent corrosion protection. Recommended for use over properly treated metal substrates.
Oooooh, sounds toxic and downright indestructible.
Update 28 Aug - weather is not cooperating. Rainy today. Reinstalled compressor, and relocated first water separator 5 more feet away from compressor as when it was 4 feet up the line the air was still too hot to condense and be separated. Moved another 5 feet, might help but I do still have the second separator that moves where I need it.
Update 29 Aug - still raining. Too wet to sandblast. Starting to think my timeline may need to bounce back a bit. Won't take much more than a few hours to strip the front suspension out. Then a few more to prepare for sandblasting, couple to do the blasting and another to clean up.
25 August 2013
1800 miles and all is well
Just back from a trip to the North Carolina Outer Banks.

1800 miles of travel to and from an amazing seashore. Not a single issue that prevented us from our next adventure. My brakes squeaked a bit, but probably from glazing over in some deadlocked New Jersey traffic. Also have some new squeaks from suspension, which I am sure is due to the alignment, but will be alleviated in the new suspension build.
Lots of comments wherever we went, and even a moving photo session when we passed a couple V Dub tuners. They caught up and took a bunch of photos. The wife fit right into it, playing the Asian Vanagon race queen. Funny stuff.
22 August 2013

20 August 2013
Dash cluster blue foil
Since the alignment, I only went for a small test ride.
When I got on to the open road, I realized the speedometer was not working correctly and was reading far less than I knew I was going. Verified this on the speed box app on my phone. Need this to properly judge when I need to stop for fuel as my fuel gauge is not really accurate. Something I have just dealt with, and find easier to just start looking for fuel when the odometer reaches 225. That gives me a buffer of 75 miles before emergency backup.
Movie reference
Wingman: Fuel status says we seriously look now.
Chojinchef: Wait a minute. Fuel status? You have a reserve, don't you?
Wingman: Yes, sir. I've got a ten minute reserve... but I'm not allowed to invade that except in time of war.
Chojinchef: Listen, mister, if you don't get me on board with some goddamn fuel, that just might be what you'll have with my wife! You got me? Now you have ten more minutes' worth of fuel, we keep looking ten more minutes!
Lifted the cover off, reached in and found the cable not plugged completely into the speedo. Although when I tried to plug it in, the cable was too tight. Alleviated this underneath, and again reached in to plug the cable in correctly. This time I got a burn on the underside of my wrist, and I watched smoke wisp up from the cluster. The foil had separated and had arc'd against itself.
I lost the directional indicator, the temp gauge, and the fuel gauge. Have another at home, but this week I will be without I guess.
Speedo is working correctly though. Two steps forward, one back.
UPDATE - with the loosening of everything for the alignment, and the humidity of August I am now getting some interesting squeaking from the suspension. Had some definite new noises this week and will continue to look forward to the front end complete rebuild to get rid of them.
UPDATE - with the loosening of everything for the alignment, and the humidity of August I am now getting some interesting squeaking from the suspension. Had some definite new noises this week and will continue to look forward to the front end complete rebuild to get rid of them.
16 August 2013
Anxiety sets in
Due to the new rack and tie rod assemblies, I set up an alignment tomorrow AM.


UPDATE - she did well, despite older parts. The passenger front cam bolt would not move enough to make wheel within spec (real close, no cigar) but my replacements should do the trick come winter.
UPDATE 31 Aug - read this on the Go Westy site
There is no way I will be able to pass 100% with the older parts, but at least I won't chew up the Michelin Pilot Sports any more than necessary over rest of season. Then come late fall / early winter, tear it all out and sandblast the underside, paint and rebuild.
Will ride better than new.
At that time I can do the three window tent as well. That's been sitting in the garage for months, with no time to do it. That and the Wasserstopper.
Alignment is covered in the Bentley as follows:
Front Suspension on the Vanagon: Alignment Challenges
The problem with a Vanagon's front suspension is the same thing that makes it great: it has a lot of suspension travel. It's what gives the Vanagon such a great "ride." Vanagons, in fact, have almost twice the suspension travel than the average vehicle on the road. No suspension design can maintain perfect alignment throughout its entire travel—and, in the case of the Vanagon, the challenge is even greater. Adding or subtracting load causes the vehicle to lower or raise. The measured alignment variables—namely camber, caster, and toe—all change with differences in loading and the resulting suspension height.
We recommend 100 lbs be added to both front seats before attempting to align the front end. Better yet, if you know how your Vanagon is loaded most of the time, load it accordingly. For example, if you drive by yourself 90% of the time, and you weigh 200 lbs, then our recommendation is perfect. If, on the other hand, you almost always travel with a passenger that also weighs 200 lbs, then load your vehicle in that manner. Basically, for the best tire wear and vehicle efficiency, your vehicle should be loaded so that it closely approximates the way in which you use it most often.
Now, it is not actually necessary to physically put weight in the vehicle to load the suspension and get it to the desired ride height. At our shop, we just have one or two guys jump into the front seats, and then we measure how much the vehicle drops in height. Then we tell them to get back to work, 'cause break time is over! Afterward, we simply pull the vehicle down to that height on our alignment rack using a pulling jack. The same can be done using a winch or come-along. Any alignment shop worth their salt will have the ability to effectively set the vehicle at the correct loaded height beforeany front end alignment is attempted. You can be proactive by advising them about the type of load under which your vehicle is most often operated.
Getting the correct loaded height is even more important on Vanagons that have been raised with lifting springs. On lifted 2WD and 4WD Vanagons, the upper A-arm ends up at a sharper downward angle. This causes a high degree of positive camber when the vehicle is unloaded. The problem is present only at the top 1” of suspension travel, and it is more prominent on 2WD models. It is not possible to get the camber angle within spec unless the vehicle is loaded with the weight of at least one human. Luckily, these vehicles are not remote-controlled and require at least one human behind the wheel (no backseat driving!). So, the problem of getting the desired alignment specifications is solved by simply getting the vehicle as close as possible to actual loaded height.
Update: If you have 2WD lifting springs on your Vanagon, try installing a pair of our new upper ball joint spacers. Click here to read more about the spacers, and check out the product page in the "Related Products" section below.
One more tip: If new springs have been installed, or any extensive front suspension work has been done (bushings, ball joints, etc.), it is a good idea to get the alignment “close” and then take the vehicle out and mash it over some big bumps before the final alignment is performed. Springs are likely to settle into their perches, bushings will take a set—stuff will change.
So, mash away before getting in there and trying to split hairs at your friendly neighborhood satellite-calibrated, dilithium crystal laser-guided alignment machine…
Subscribe to:
Comments (Atom)