06 December 2012

Westies at Watkins

If you are in the range of a Vanagon trip to Watkins Glen, I recommend it.

I had no idea what to expect, and as per usual this summer, it was due to rain all weekend so the wife stayed home.  Was just the boy and I getting ready to have some fun.  Watkins Glen NY is the home of the famous racetrack, but lesser known (at least to me) was the Gorge. 

The event is put together by the folks at the Empire VW camping club, as an event for LiMBO.  It was held at the Watkins Glen State Park the weekend of September 21st.

The state park is well kept, spots are far enough apart and the place was packed despite the rain.

Potluck dinner one night.  Anticipating the cold September rain, I brought a couple gallons of New England style clam chowder.

Was gone in minutes!

Left only with the nasty pot to clean up, and barely a bowl for my son.


The highlight for my son was the VW's racing around the track.  Honestly, it was quite the scene. 

Much fun ad by all.


For $25 you got three laps.  Sure there was a pace car, but YOUR IN A VW BUS!  You are not going to be knocking on triple digits, and if you are, there is an 84 diesel with 49hp at the next corner that will get in your way.


After the second lap, they stop at the finish line for pictures.


High quality (not) video taken with my iPad duct taped to my dashboard can be found here
http://www.youtube.com/watch?v=u7TmGEqAkLw

My pedal rivets busted apart on lap three. Quick repair on side of the track and we finished with grins on our faces.


October fish

Fishing in Vermont's Lewis Creek ends on October 31st.  Wanting to squeeze every opportunity out of my 50 something dollar license, I headed up on the 26th for a day of fly fishing with a Chef friend who works out of Burlington, VT.


Nice ride up.  Bit past leaf season, so the colors were faded but the leaf peepers who screw up traffic flow any time they can were not to be seen. Love the Vermont countryside with its mountains, farms and covered bridges.  KEEP VERMONT WEIRD.

As for the fish, it was a bust.  Not anything more than a half assed nibble.  As for the fun and camaraderie; a great day.  Got some casting practice and alot of laughs.

After changing out of our waders, we decided to track down some Switchback Ale.  It was only the second week since the bottled version of this delicious libation became available and the locals were buying it up. 

On our way we stumbled upon this little pizza place that does brick oven style pizza and only on fridays from 4:30 to 7.  These nice folks do it because they love it, not because they need to do it.


Kicked back with our ale while we devoured our pizzas and told fish stories.


Starter and front heater core

So now its December.  The Thingamajigger served me VERY well this year despite the late start.  I am currently using it as a daily driver as the S420 is having 'issues'.  She is still doing well despite the cold.

Only issues as of late have to do with the lack of front heat and my starter went south.

Lets begin with the starter. . .

As I said, I am using it now as the daily driver.  I loaded a Merrychef e4 oven in it and went down to a local distributor to discuss the oven with a client.  All went well until I tried to leave.  One turn of the key, and a nasty grinding noise left me dead in the parking lot.

Warehouse guy leaving for home helped me push start it and I was on my way home. Ordered a hi torque unit from Go Westy.

Next day a friend lent me his 'semi working' spare and I changed them out.

This is what I found.

The unit on the right is obviously the failed unit.  There is absolutely nothing that can be done to avoid this, its just a failed part.  Probably fatigued from years of starts.

Will probably be dropping the new Hi Torque starter in tomorrow after work.  Looking forward to it.


Now for the juicy one.

If you own a Vanagon and do your own work, sooner or later you are going to have to yank the dash out.  Whether it be due to a failed part, mice stench, or just preventative it is a rite of passage for all Vanagon owners.

If you are lucky and can prepare fully for the event, than good for you!  I was indeed one of these lucky souls as mine was due to choice, rather than necessity.

I had prepared for the event, as anyone who has read prior posts will remember.  I rebuilt the heater box last year but have not had the time to install it.  I bought a new wiper motor, which is easier to install with dash off.  Also the windshield washer lines.  They harden and crack, just cheap insurance against leaks.  The last part is the brake booster.  A BMW unit from a early 80's will increase the pressure on the calipers, thereby stopping power and still fit nicely behind the dash.  I bought the part, but chose not to do this right away as I need the car for daily driving now. Maybe over winter I will tackle that project and re-do some of the metal lines.

So as for the dash, I had it out in less than an hour.  There are a variety of helpful hints on the net, follow any ones direction as its fairly straightforward. 

I had access to the heater box quickly and removed the 6 screws holding it in place.  After pinching the hoses with needle nose vice grips covered in fuel line (to not harm the hoses), and placing a collection of old t shirts under the hose connections, I released the worm clamps and slid the heater box out.

The new box was a bit different from the original 84 box, as you can see below.

The 84 box is on the left.  The motor was seized and the core was blocked, but no mice and no turds.  The later style box on the right that had been rebuilt with new core, motor and flap gaskets.  The difference is on the location of the air outlet ports.  The new box has a set of oval shaped ports on the front panel of the box (left in picture) and the round ports towards the back are blocked on the new box and used on the older style box.  Make sense?

I need to come up with a permanent block for the oval ports, using duct tape temporarily is sort of ghetto.

Reinstalling the dash is fairly straightforward.  Trickiest part is supporting the dash in a position where you can access all the things you need to connect, and also have enough light to do so.  I was quickly running out of sunlight, so I suspended a halogen light above the front end.  Worked great, had plenty of light, was out of the way until it dropped on the bottom of my windshield and cracked the 4 month old spiffy windshield.  crap.

Bleeding a Vanagon cooling system is an art unto itself, add in the Zetec and you have the makings for true frustration.  Until you try for yourself, I cannot describe it properly enough.

09 August 2012

So last night . . .

Yes  there is MUCH to go over getting me to this point, but I have been a busy man the last couple days.

Monday night I picked up my Bostig.  My engine has served her purpose dutifully and has not let me down, but she is tired and leaking from one of the gaskets.


So the observant reader will notice that I bought a turnkey version.  Yes, I do have the skills to install one of their kits easily, and yes it was  more expensive to buy a turnkey.  However many skills I have, one of them is knowing a good deal.  By purchasing the turnkey, I get the high capacity oil pan, the SCT reflasher included, an engine with less than 40k, and a 5 year warranty on the engine.  Plus at this point in the year, after being down more than I wanted for paint I need to minimize my downtime and maximize our enjoyment of the van or the wife will get on me.  Happy wife - happy life!

Since Bostig is an hour from my home, I went to pick it up and save shipping. 

Two nights ago, I yanked the WBX out of the van.  I did it myself and in one piece.


I put the van up on ramps with a piece of plywood underneath.  I then disassembled the wiring I would not require and placed over the top of the WBX.  I lowered the engine and transmission down upon a bread rack roller I had around and slid it right out.


Complete removal - ecu, fuel system, electrical system all still attached.  This will either be placed into my parts van (after a head gasket repair) or be sold as a complete unit.

Last night, after getting pissed off by a client, I started prepping the van's engine bay for the installation. 


Sandblasted the compartment.


Sprayed Dupont's Metallok primer and allowed to cure.


And then sprayed the Imron color to match the body this morning at 5:30.  It will be 90 degrees today while I work, so the paint should cure up nicely before I get home. 

I have already installed the clutch assembly on the zetec, changed out the transmission oil and can mate them together tonight.  Will require assistance to get the motor back in so I can make sure I do not ruin my new engine bay paint while jacking the engine up.

Keeping track of time to install?  Remove WBX took 2 hours.  Prepare and perform sandblasting took 2.5 hours and most of that was constructing a tarp tent inside the van to contain any aggregate mess.  Clean up the mess, wipe down, tape up the bay and to spray the primer took about an hour.  and then to paint the color and clean up the mess this morning took about an hour.


Jumping ahead

We find a completed (are they aver REALLY completed?) Vanagon, with new bits and pieces installed.  We will delve into various systems installations, but since it has been a month since painting, the public deserves to see the current state of the Thingamajigger.


Sixth car in the lot for the Vermont Tough Mudder.  I was a bit excited and could not sleep anyway.

Numerous comments while we were at the event on the van.  Everything from 'Cool van man' to 'What the F*** is that?'


On the way home from the Mudder (I survived it) we saw a couple other Westys.  We stopped and enjoyed the Vermont views wherever we could.
My son believeing that the Thingamajigger needs a hood ornament like the Mercedes.  He broke our statue of Buddha earlier in week and I found it propped up on the van.  Strangely appropriate, yet unsettling.


Enjoying the New Hampshire countryside.
 

 The Passaconaway park on the Kancamagus Highway.  Met another Westy owner here.  Nice 86 weekender painted Pearl white.


Nothing like a heavy downpour to prove that you really do need windshield wipers.  This one turned 180 degrees on me in a hurry, leaving me to pull over and swap the passenger one over and continue with a single wiper.  Later I found that I had picked up a nail when I pulled over and needed to get my tire repaired too.

Painted

As I write this, the van has been painted approximately 1 month.  So I am being lazy about maintaining progress on the blog.  Have actually been using the van for some camping.  A weekend in New Hampshire's Kancamagus Highway with my son, and a weekend in Massachusetts' Erving State Park.

And here she is, The Thingamajigger!

So this is how she looked after driving home from the body shop.  Only glass installed is the windshield which I had a glass shop install a new one.  The old one was cloudy around the edges.


As you can imagine, she needs a TON of work to replace all the bits and pieces that have been removed to get her here.
You can notice the missing flue vent here.  cleans up the lines a bit.

No gaskets in front doors here, just some rags and duct tape holding doors closed.
Clean tail section.  Did install the gasket in hatch, along with the rubber bumpers but a bungee cord is holding it closed.

23 July 2012

Off to paint


Got the body work done.
The small warp I put in the panel.  Couple dings that needed taking care of and the flue vent that was welded up.

The rear quarter needed some light body filling.  These are large flat panels that will show every single flaw.  Its a good thing that it is a light color, that will help.  But a good solid blocking will be necessary for a quality paint finish.


Coated with Metalok to bind up the bodywork.  Next will be a coat of the gray high build primer that can be blocked out nicely.

Multiple pictures of blocking out a van are not very blog worthy.

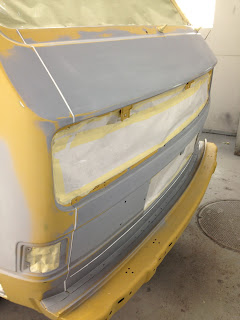
So after blocking out the panels I had prepared, I coated it again with the high build primer for the delivery to the shop where it will be painted.


In the booth we did the final seam sealing and taped up the body exposing the jambs for paint as well.  We needed a solid base, one that could withstand a beating from multiple kids and many trips.

Next stop - painted and pretty.

So the panel got welded.  It was slow and tedious.  Small weld and cool, small weld and cool - all in efforts of lessening any warpage on the Bus Depot 22ga panel. 

 
The panel did sustain some warping, I think from the grinding but it was minimal.  The manufacturers of the panel should really consider making this from a thicker gauge metal.  The smaller pieces with compound angles are fine in the thinner gauge, but a long straight panel like this really needs a thicker gauge.

After the panel was welded up, I got to working on the floor inside.  I first needed to see what I was working with and the extent of the rust damage.  I took the sandblaster to the interior wall and floor panel.

I needed to reconstruct some support for the floor.  Two 18ga panels creased in the correct angle tack welded and then panel glued. 
A second set of panels was knocked up to clean up some perforations in the floor under the galley.
Also seen in this picture is the smallish panel welded in to remove the unnecessary flue hole.
Now the panel needed to be protected.  Coated with Metalok and allowed to cure overnight.


The following day I seam sealed all the welded edges and seams with the Sikaflex.

I then painted the interior panels with the correct color in Imron.

Now the interior is as strong and well protected as the exterior.


08 May 2012

Monday the 7th

I did NOTHING on the van.

Now its raining.  Should have done something instead of spreading 8 yards of mulch last night.  Yard does look good though.  And with 4 yards left to move, I am almost done with spring yard cleanup.

06 May 2012

Drivers quarter Partie Trois

So I was tinkering today.

Started with the sandblaster as it was the first no rainy day in a week.

This is the aforementioned slice I cut in the forward panel to allow for the overlap and welds necessary for the new panel attachment.  The rear portion will be attached through customary means via access from rear of panel through kitchen.


As you can see, the sandblaster made nice work of cleaning off any of the rust, finish and undercoating applied at the factory.

I have nice clean surfaces to adhere the new panel and make it as good as new.

The replacement panel is a bit thinner than the factory sheet metal.  I have not measured it, but I would guess the new panel is a 22 gauge and the factory is 18.


So, I still need to assess how I will deal with the floor extension that used to sit with the seam that was rusting out.  Now without that seam, I have no place readily available to attach the floor extension.  Suppose I can custom bend something and attach with an auto body adhesive.  The floor piece does not support weight. Its mostly for the continuance of the floor panel, to avoid any body shifting noise and to seal up the body compartment.  I need to come up with a solution and I am currently of the thought to install the outer panel, and do any floor piece from the inside.

Well, while I contemplate this dilemma - I got to finishing the sandblasting of the rear quarter after the wheel arch was installed, again went over the seams and made sure the rain gutter was done up right.

Then I got the panel cleaned up, taped up and another final cleaning before laying a nice coat of the Metalok epoxy primer.


Now that panel is wrapped up and the only ones left are the center panel (which I am working on) and the roof panel (which I have no clue how I will proceed).

I do want to get in the jamb of the rear hatch with the sandblaster prior to coating with the high build primer.  I will be able to metal tape off the portions of the van that I have already primed, scuff up the edges and apply the Metalok inside the jamb.

Maybe tomorrow night I will tack in the new rocker panel and make up a block plate to weld in to get rid of this vent hole.

This hole was for the refrigerator vent flue.  Since I have removed the refrigerator, I see no reason to keep the hole - seems like another potential source of leaks.
Today's tobacco creation. Flavorful, good draw but tough burn.


03 May 2012

Wheel well finale

Finished up the wheel wells tonight. After sandblasting the upper portion of the wheel well the other day, I primed it with the epoxy primer and allowed to cure. I went back today and used the Sikaflex sealer to seal up all the seams from the inside. It cured itself in a couple hours and I painted the inside of the vans walls, the upper wheel well and the Sikaflex with white paint. That way I can easily see any return of oxidation.

So while I was waiting on a curing of the Sikaflex, I had a visitor.   The neighbors kid has this go kart.  He recently cracked the frame and I welded it.  Now ever since, if there is a tweak needed on the kart, I am the one he brings it to.  I replaced the intake on it and corrected the throttle cable routing and the thing does twice the speed it used to.  I have taken it for a spin and its fun, but better for the kid as my 180 pounds is a bit too much for the 6.5hp Tecumseh

Today he bent the tie rod mount on the spindle.  Then I adjusted the throttle cable again, and the neighborhood kids were hanging about waiting to ride the thing. 


So after taking care of the neighbors kid, I went to work on the closet cabinet. The part of the cabinet that faces the window was always a nasty sight. So I went to Lowe's and bought me a piece of 1/4 inch birch plywood. Its not marine grade which is a pure 3/16 thick panel that has better grain and look to it.  The box stores sells a veneer type sub grade panel that is a mixed core with birch outer veneers.  For this application, it works just fine.

I cut it appropriately to replicate the size of the nasty board that I removed and set to covering it.

I have some headliner material that I bought from Go Westy. I am using that to cover the plywood piece as the original was some sort of plastic sheet that deteriorates. It will look good and will hold up better. By wrapping the board similar to a custom interior installation, I can fasten the board onto the cabinet with some brass screws and the material will not pull or come off. Although I will use some spray tack to mount the material, I think the wrap technique and the screws will ensure a clean install that will last for years to come. Now although I have finished with the install of the replacement board, I have also taken the liberty of cutting away a portion of the upper cabinet giving me some additional storage space.
 
  Looks large enough to tuck the jack and lug wrench away. Maybe a couple umbrellas or something. So the cabinet will not be reinstalled right away. I am leaving it out for the paint process.

Access to the windows all around will be paramount to a quality paint job. Installation can take place after the paint is applied, the windows are reinstalled and it is appropriately cleaned.