I did NOTHING on the van.
Now its raining. Should have done something instead of spreading 8 yards of mulch last night. Yard does look good though. And with 4 yards left to move, I am almost done with spring yard cleanup.
08 May 2012
06 May 2012
Drivers quarter Partie Trois
 So I was tinkering today.
Started with the sandblaster as it was the first no rainy day in a week.
This is the aforementioned slice I cut in the forward panel to allow for the overlap and welds necessary for the new panel attachment. The rear portion will be attached through customary means via access from rear of panel through kitchen.

As you can see, the sandblaster made nice work of cleaning off any of the rust, finish and undercoating applied at the factory.
I have nice clean surfaces to adhere the new panel and make it as good as new.
The replacement panel is a bit thinner than the factory sheet metal. I have not measured it, but I would guess the new panel is a 22 gauge and the factory is 18.
So, I still need to assess how I will deal with the floor extension that used to sit with the seam that was rusting out. Now without that seam, I have no place readily available to attach the floor extension. Suppose I can custom bend something and attach with an auto body adhesive. The floor piece does not support weight. Its mostly for the continuance of the floor panel, to avoid any body shifting noise and to seal up the body compartment. I need to come up with a solution and I am currently of the thought to install the outer panel, and do any floor piece from the inside.
Well, while I contemplate this dilemma - I got to finishing the sandblasting of the rear quarter after the wheel arch was installed, again went over the seams and made sure the rain gutter was done up right.
Then I got the panel cleaned up, taped up and another final cleaning before laying a nice coat of the Metalok epoxy primer.

Now that panel is wrapped up and the only ones left are the center panel (which I am working on) and the roof panel (which I have no clue how I will proceed).
I do want to get in the jamb of the rear hatch with the sandblaster prior to coating with the high build primer. I will be able to metal tape off the portions of the van that I have already primed, scuff up the edges and apply the Metalok inside the jamb.
Maybe tomorrow night I will tack in the new rocker panel and make up a block plate to weld in to get rid of this vent hole.
 This hole was for the refrigerator vent flue. Since I have removed the refrigerator, I see no reason to keep the hole - seems like another potential source of leaks.
 Today's tobacco creation. Flavorful, good draw but tough burn.
03 May 2012
Wheel well finale
Finished up the wheel wells tonight. After sandblasting the upper portion of the wheel well the other day, I primed it with the epoxy primer and allowed to cure. I went back today and used the Sikaflex sealer to seal up all the seams from the inside. It cured itself in a couple hours and I painted the inside of the vans walls, the upper wheel well and the Sikaflex with white paint. That way I can easily see any return of oxidation.

So while I was waiting on a curing of the Sikaflex, I had a visitor. The neighbors kid has this go kart. He recently cracked the frame and I welded it. Now ever since, if there is a tweak needed on the kart, I am the one he brings it to. I replaced the intake on it and corrected the throttle cable routing and the thing does twice the speed it used to. I have taken it for a spin and its fun, but better for the kid as my 180 pounds is a bit too much for the 6.5hp Tecumseh
 Today he bent the tie rod mount on the spindle. Then I adjusted the throttle cable again, and the neighborhood kids were hanging about waiting to ride the thing.
So after taking care of the neighbors kid, I went to work on the closet cabinet. The part of the cabinet that faces the window was always a nasty sight. So I went to Lowe's and bought me a piece of 1/4 inch birch plywood. Its not marine grade which is a pure 3/16 thick panel that has better grain and look to it. The box stores sells a veneer type sub grade panel that is a mixed core with birch outer veneers. For this application, it works just fine.
I cut it appropriately to replicate the size of the nasty board that I removed and set to covering it.

 I have some headliner material that I bought from Go Westy. I am using that to cover the plywood piece as the original was some sort of plastic sheet that deteriorates. It will look good and will hold up better. By wrapping the board similar to a custom interior installation, I can fasten the board onto the cabinet with some brass screws and the material will not pull or come off. Although I will use some spray tack to mount the material, I think the wrap technique and the screws will ensure a clean install that will last for years to come.
Now although I have finished with the install of the replacement board, I have also taken the liberty of cutting away a portion of the upper cabinet giving me some additional storage space.
I have some headliner material that I bought from Go Westy. I am using that to cover the plywood piece as the original was some sort of plastic sheet that deteriorates. It will look good and will hold up better. By wrapping the board similar to a custom interior installation, I can fasten the board onto the cabinet with some brass screws and the material will not pull or come off. Although I will use some spray tack to mount the material, I think the wrap technique and the screws will ensure a clean install that will last for years to come.
Now although I have finished with the install of the replacement board, I have also taken the liberty of cutting away a portion of the upper cabinet giving me some additional storage space.

 Looks large enough to tuck the jack and lug wrench away. Maybe a couple umbrellas or something.
So the cabinet will not be reinstalled right away. I am leaving it out for the paint process.
Looks large enough to tuck the jack and lug wrench away. Maybe a couple umbrellas or something.
So the cabinet will not be reinstalled right away. I am leaving it out for the paint process.
Access to the windows all around will be paramount to a quality paint job. Installation can take place after the paint is applied, the windows are reinstalled and it is appropriately cleaned.

So while I was waiting on a curing of the Sikaflex, I had a visitor. The neighbors kid has this go kart. He recently cracked the frame and I welded it. Now ever since, if there is a tweak needed on the kart, I am the one he brings it to. I replaced the intake on it and corrected the throttle cable routing and the thing does twice the speed it used to. I have taken it for a spin and its fun, but better for the kid as my 180 pounds is a bit too much for the 6.5hp Tecumseh
 Today he bent the tie rod mount on the spindle. Then I adjusted the throttle cable again, and the neighborhood kids were hanging about waiting to ride the thing.
 So after taking care of the neighbors kid, I went to work on the closet cabinet. The part of the cabinet that faces the window was always a nasty sight. So I went to Lowe's and bought me a piece of 1/4 inch birch plywood. Its not marine grade which is a pure 3/16 thick panel that has better grain and look to it. The box stores sells a veneer type sub grade panel that is a mixed core with birch outer veneers. For this application, it works just fine.
I cut it appropriately to replicate the size of the nasty board that I removed and set to covering it.

 I have some headliner material that I bought from Go Westy. I am using that to cover the plywood piece as the original was some sort of plastic sheet that deteriorates. It will look good and will hold up better. By wrapping the board similar to a custom interior installation, I can fasten the board onto the cabinet with some brass screws and the material will not pull or come off. Although I will use some spray tack to mount the material, I think the wrap technique and the screws will ensure a clean install that will last for years to come.
Now although I have finished with the install of the replacement board, I have also taken the liberty of cutting away a portion of the upper cabinet giving me some additional storage space.
I have some headliner material that I bought from Go Westy. I am using that to cover the plywood piece as the original was some sort of plastic sheet that deteriorates. It will look good and will hold up better. By wrapping the board similar to a custom interior installation, I can fasten the board onto the cabinet with some brass screws and the material will not pull or come off. Although I will use some spray tack to mount the material, I think the wrap technique and the screws will ensure a clean install that will last for years to come.
Now although I have finished with the install of the replacement board, I have also taken the liberty of cutting away a portion of the upper cabinet giving me some additional storage space.
 Looks large enough to tuck the jack and lug wrench away. Maybe a couple umbrellas or something.
So the cabinet will not be reinstalled right away. I am leaving it out for the paint process.
Looks large enough to tuck the jack and lug wrench away. Maybe a couple umbrellas or something.
So the cabinet will not be reinstalled right away. I am leaving it out for the paint process. Access to the windows all around will be paramount to a quality paint job. Installation can take place after the paint is applied, the windows are reinstalled and it is appropriately cleaned.
01 May 2012
Rear quarter revisited
Got to finishing up the rear quarter.
I removed the rear overhead cabinet, and then the closet cabinets to gain access to the top of the wheel well in the vans wall cavity.

I then broke out the sandblaster and cleaned up the weld area and complete top of the wheel well. I wanted all traces of oxidation removed.

Picture is not the greatest, and I did some more after this shot was taken, but you get the idea. A clean panel means a good clean weld. It will also ensure that the seam remains rust free for a long time.
 After breaking out the shop vac, and a mini hose to get into the wall I got to welding. I did have a mishap while welding; after aligning up the panel, I was getting in and out of the rear of the van to make sure I was not lighting the undercoat on fire and the panel moved without my noticing. I then welded it up and have a slight warp in one part of the panel. It means a bit of bodywork, but its not that bad.
After cleaning up the welds, I primed up the upper part of the wheel well and will allow to cure overnight. Tomorrow I will break out the sealer.
So with some time to wait - allowing the primer to cure, I don't know why I would not fire up a cigar while contemplating my next steps?

This Kristoff was one of the better cigars I have had in a while. Was so good, I did not want to put it down. Smoked it to a nub.
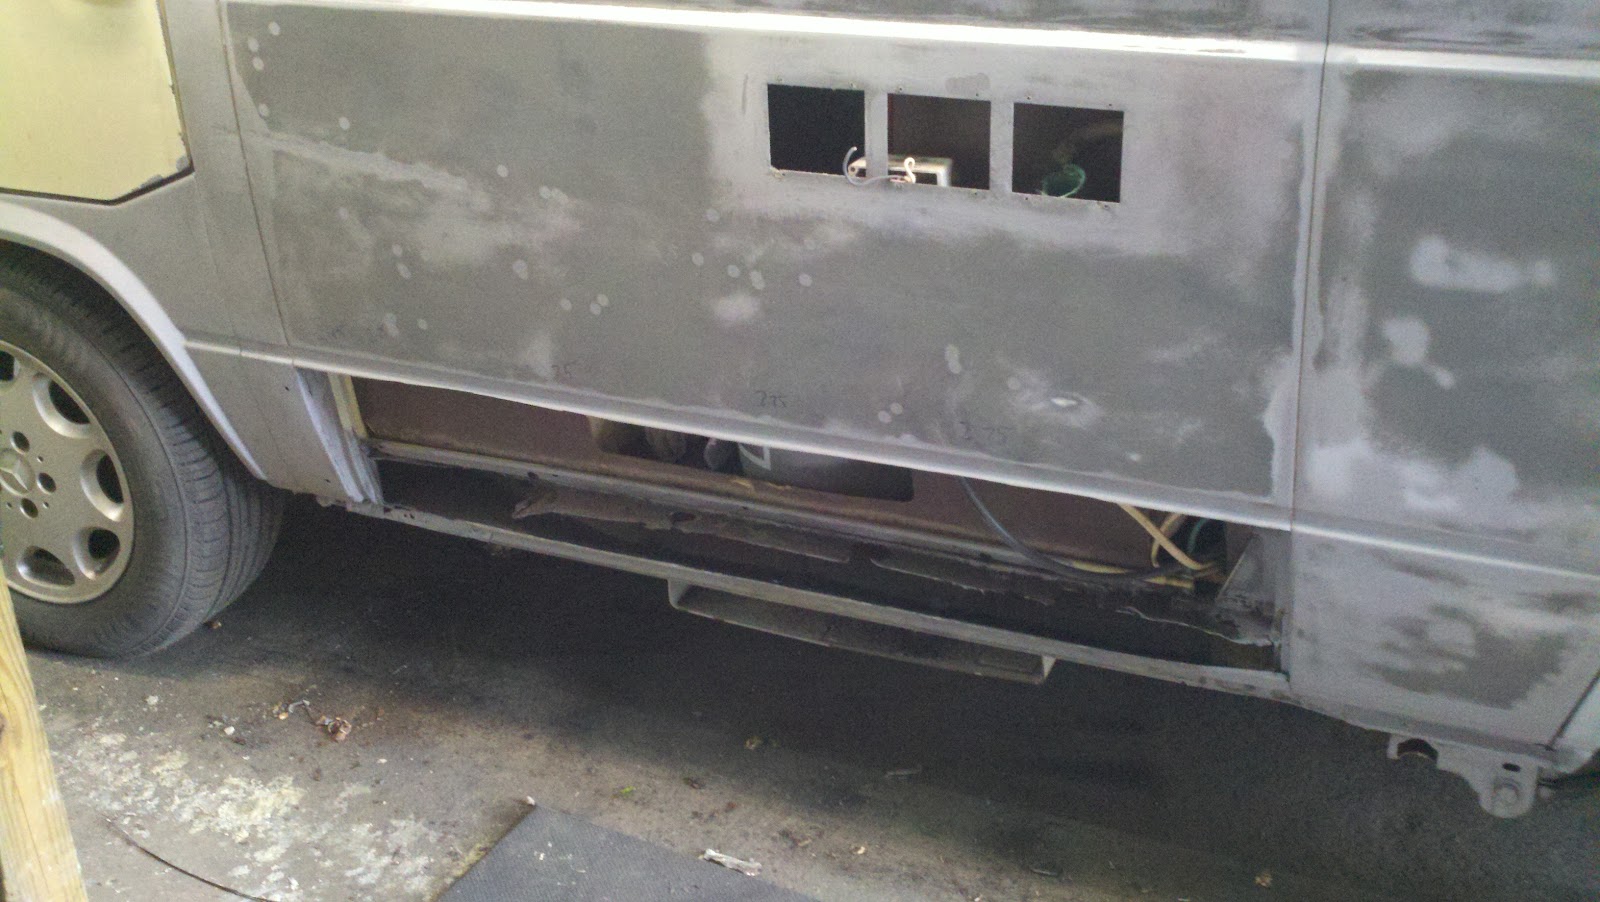
So while I am drawing on the cigar, I figure my next step is to start on the drivers side rocker panel.

Its ugly - real ugly in there. Going to have my hands full with this repair.
I removed the rear overhead cabinet, and then the closet cabinets to gain access to the top of the wheel well in the vans wall cavity.

I then broke out the sandblaster and cleaned up the weld area and complete top of the wheel well. I wanted all traces of oxidation removed.

Picture is not the greatest, and I did some more after this shot was taken, but you get the idea. A clean panel means a good clean weld. It will also ensure that the seam remains rust free for a long time.
 After breaking out the shop vac, and a mini hose to get into the wall I got to welding. I did have a mishap while welding; after aligning up the panel, I was getting in and out of the rear of the van to make sure I was not lighting the undercoat on fire and the panel moved without my noticing. I then welded it up and have a slight warp in one part of the panel. It means a bit of bodywork, but its not that bad.
After cleaning up the welds, I primed up the upper part of the wheel well and will allow to cure overnight. Tomorrow I will break out the sealer.
So with some time to wait - allowing the primer to cure, I don't know why I would not fire up a cigar while contemplating my next steps?

This Kristoff was one of the better cigars I have had in a while. Was so good, I did not want to put it down. Smoked it to a nub.
So while I am drawing on the cigar, I figure my next step is to start on the drivers side rocker panel.

Its ugly - real ugly in there. Going to have my hands full with this repair.
Subscribe to:
Posts (Atom)